How do I customize my course site?
This section provides an overview on designing a course site using good pedagogical practices with technologies supported by the Office of eLearning.
A well-organized course site can improve a student’s experience, particularly if the course is delivered in a hybrid or online format. We will cover three supported technologies: ???
Your course site is the hub of your course, a central location that students can go to for practical information, resources, and the tools you are using for assessments, live class sessions, communication and discussion, and other activities. Taking the time to organize and customize your course site up front will save you and your students time while providing a road map for students to follow.
Site design fundamentals
Put important information and frequently-used items higher up. On the web, readers scan pages, so put the most important content at the top. This is where students will look first, similar to the way newspapers put the biggest headlines “above the fold.”
Provide a road map. Consider how you want students to progress through your course. Are you organizing your course content by topic or by week? If you are organizing pages by topic, how many topics or pages need to be completed per week? Before setting up your site’s structure, you may find it helpful to sketch a course outline to work out how you will divide content into chunks by week and/or topic (if you are utilizing the course template your site is already set up by week with the correct course dates).
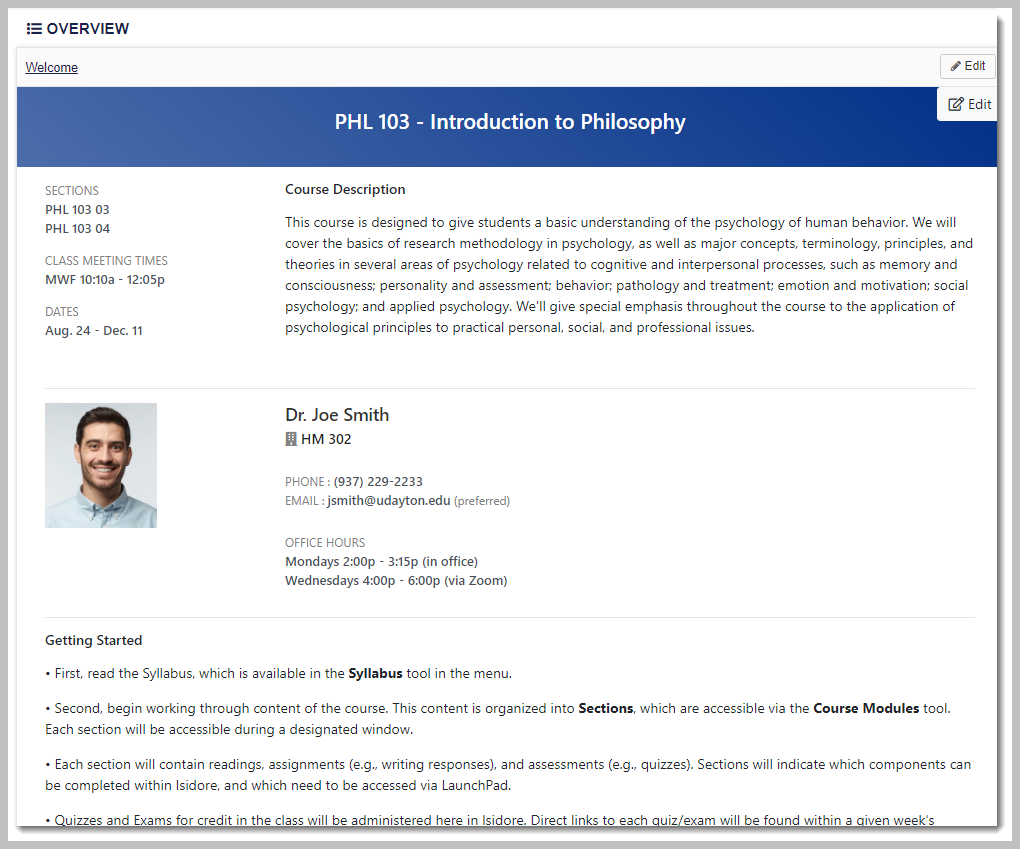
Keep your home page simple. We recommend that you retain and utilize the newly created Homepage Builder to provide quality, streamlined information regarding your course and contact information. It also provides a consistent, unified, professional look to all UDayton course pages.
Add a human element. To make your site more approachable, consider adding a welcome video with a preview to the course to the introduction module of your course.
Incorporate images and media to improve engagement. Simple changes like adding a banner image to your course site, including a photo or video of yourself with your introduction or syllabus, or adding one topical image on each content page, can make a huge difference to how engaging your course site and pages will be to students. However, use images and videos judiciously in your course site to avoid overloading students. Also, make sure to follow appropriate copyright policies.
Use color and emphasis sparingly. Color can be a great accent when used as a supporting element of a page, but multiple colors or lots of color can look cluttered and confusing. Use color selectively for certain types of content. Similarly, bold text can be highly effective for emphasizing important content, but only if it’s used occasionally. (And avoid using italics and underline except in specialized cases.)
Leave some whitespace. Web pages look better and are easier to read when they include some empty space as a visual break and to keep the design balanced.
Resources
- Creating a Student-Centered User Experience in Your LMS Course (Temple University)
Using Isidore
Isidore is University of Dayton’s-supported learning management system, intended specifically for the purpose of delivering a course and integrating with your class roster. Isidore has a wealth of tools and features to help you manage your course, and we recommend it as a natural choice for creating a holistic and versatile learning experience. Here are some ways to ensure that your course site is well-organized and welcoming.
Start off strong
Create an inviting home page. The Overview tool provides a homepage for your course site that automatically shows highlights from the Calendar tool, Announcements tool, and Email tool, if those tools are enabled in your course. Using the Homepage Builder will make this process simple and easy to create a professional and informative landing page for your course.
Direct students to how they can get started with the course. This could include directing them to read the syllabus, navigate to a course introduction page, or other tools and resources.
Organize your tools and delete unused tools from the left-hand menu. Use the Tool Order option within Site info to reorder tools if some are used more frequently and/or have more importance in your course. Additionally, you can use the Manage Tools option to add tools or Lessons pages to your site.
Make course materials easy to find
Upload your syllabus as a Word or PDF document using the Syllabus tool. You can also use the Lessons or Resources tools to add your Word or PDF syllabus to your Isidore site, if you prefer. A template for a text based syllabus as well as a FAQ syllabus is already built into Isidore and is ready for your use with minor updates.
Add files to your course using the Resources tool. If you’re going to add a number of files, create folders for different types of files and use those folders consistently so that information is well-organized and easy to find. Give materials descriptive names. Link to these materials in your lesson/module pages.
Be clear about assignments and due dates
Call attention to due dates and include instructions for assignments and assessments. Include information about the assignments for each week, when they are due, and how students should submit them.
You can either direct students to a tool in the menu, such as, “Submit your paper using the Assignments tool in the left-hand menu,” or alternatively, you can add a direct link to the assignment in a Lessons page. (You can add these direct links for other tools in Isidore, including Forums, Tests & Quizzes, and Resources.)
Of course, if you’re directing students to use the tools for Assignments, Tests & Quizzes, and/or Forums, make sure to also spend some time correctly setting up those tools in your site.
Provide key information for each course unit
Create interactive web pages with the Lessons tool. These pages could have any sort of content but are most often used to provide more information about each unit (or “lesson”) of the course to create a more guided experience for the student. Weekly lesson sub-pages are already created for you with release dates corresponding to the semester weeks in the template site.
Organize your Lessons pages by week or unit in a dropdown menu by adding subpages to a Lessons page. This allows you to have a top-level Lessons page that appears in the left-hand menu and then subpages that are visible once you select the top-level page. For example, you can call your Lessons page “Weeks” and then add a subpage for each week (Week 1, Week 2, and so on); or alternatively, call your Lessons page “Units” and then add a subpage for each unit. This structure makes it easy for your students to navigate your course site and stay on track.
Include all of the relevant information for each unit or week of the course, including:
- unit/week introductions
- key topics and concepts
- learning outcomes
- assigned readings and resources
- due dates for activities and assessments
- direct links to learning activities and assessments
- images and videos
Organize that information in the order in which you’d like for students to complete it. The more comprehensive you can be in the information you provide to students for each week or unit of the course, the more likely they are to succeed.
Using Interactive Learning Apps
Learning apps are wonderful tools to incorporate creative engagement activities to your Isidore site. These are helpful in both face to face, synchronous, and asynchronous courses. You can read more about interactive learning apps on the Isidore eWiki page. Below is a list of the available tools.
- Knowledge Check
- Pre/Post Reflection
- Interactive Video
- Check-In
- Emoji Ratings
- Flashcards
- Randomly
- Topic Selector
- More...check back often as more are added each year.